5 Tips for immunostaining using multiple labels
Our advice on microscope set-up, fluorophore choice and controls to improve your multi-label IF.
A multiple immunostaining technique is a combination of individual antigen detections in order to study the expression and co-localization of two or more different antigens in the same sample.
Why perform an experiment with multiple antigen stainings (Figure 1)?
- To obtain a direct overview of multiple antigen localizations in a single tissue or cellular sample
- To identify different cell populations within a sample (time scale experiment)
- To test for co-localization. For example, one could stain for cellular markers and activation markers to infer the activity status of T lymphocytes
- To save rare tissue sections or cell samples.
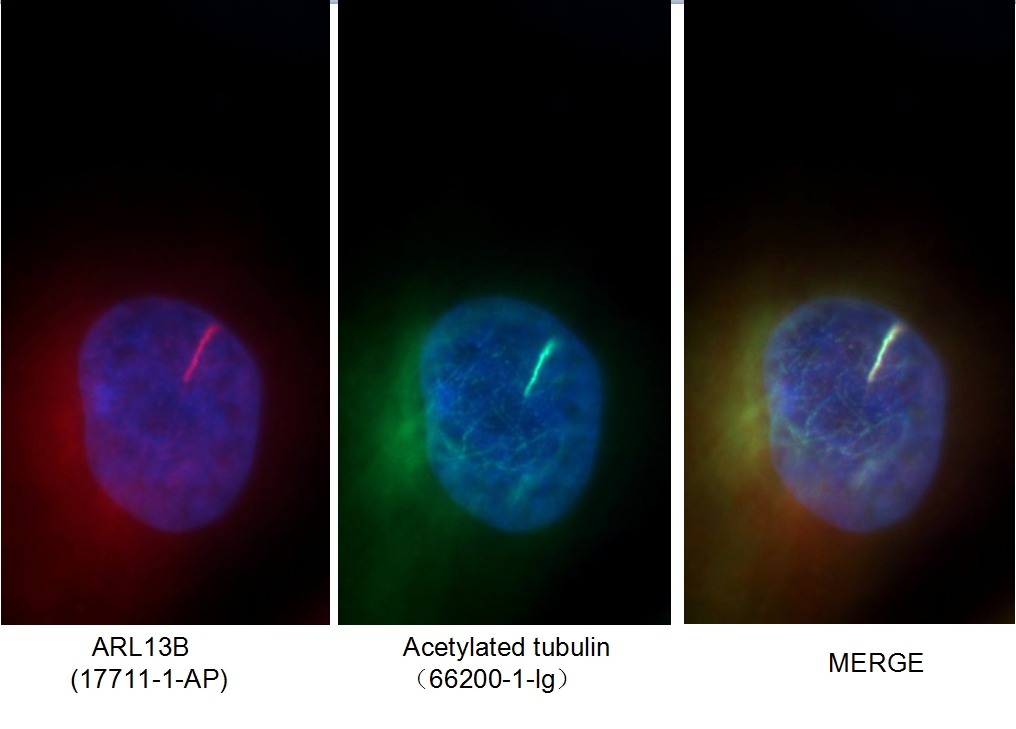
Figure 1. Immunofluorescent analysis of MDCK cells using 66200-1-Ig (acetylated Tubulin(Lys40) antibody) at a dilution of 1:50 and Alexa Fluor 488-conjugated AffiniPure Goat Anti-Rabbit IgG(H+L).
For a successful multiple staining, it is recommended to consider the following tips before running the experiment:
Tip 1: Set up your microscope
It is essential to familiarize yourself with the microscope you are going to be working with, especially its emission/excitation/dichroic filters and, for confocal microscopes, its laser lines.
- Check and set up a spectrum viewer or a fluorophore reference chart regarding fluorophore/microscope compatibility. That will help to establish the maximum excitation and emission wavelengths of the fluorophore-conjugated antibodies.
For certain filters, e.g., FITC/TRITC filters, the compatibility evaluation is quite easy as they have been named after the fluorophores they are meant to be used with. As an example, Alexa Fluor® 488 is named based on an approximate excitation maximum (in nm), which also provides some brief guidance for laser and filter selection.
Tip 2: Choose the right fluorophore; how to avoid cross-reaction(s) between individual detection channels
1. Select fluorophores with high extinction coefficients (ε)
One of the most important factors affecting a fluorophore’s brightness is its extinction coefficient; the higher the value of the extinction coefficient, the brighter the fluorophore.
2. Select fluorophores with high quantum yields (Φ)
The quantum yield is a read-out of the efficiency of the fluorescence process (Φ) and is calculated by dividing the number of emitted photons by the number of absorbed photons. Generally, a 100% efficient fluorescence process would have a quantum yield of 1 (the maximum quantum yield possible).
3. Skip fluorophores with a high photobleaching susceptibility
Photobleaching is a photochemical alteration process that decreases the fluorescence signal intensity.
Please note: You can reduce the intensity/exposure time to the excitation light or use mounting media containing antifade reagents.
4. Make sure your fluorophore staining is spectrally different from your counterstain
Please note: Counterstains provide background contrast and help to visualize observed staining (e.g., DAPI stains nuclei).
Please note: Remember to set up your counterstain and fluorophore staining to be easily distinguishable. For example, Draq5 works better than DAPI as a nuclear counterstain when using antibodies conjugated to blue fluorophores such as Alexa Fluor 405 or DyLight Fluor 405 (Figure 2).

Figure 2. Immunofluorescent staining of MAP2 antibody (17490-1-AP, 1:250 dilution) and TUBB3 antibody (66375-1-lg, 1:250) with 4% PFA fixed control hiPSC-derived neuronal cultures (35 days old). (Red: MAP2; Green: TUBB3; Blue: DAPI). Provided by BioTalentum Ltd., Hungary.
5. Use fluorophores with a narrow emission spectrum in multi-color IF experiments to avoid spectral overlap
Spectral overlap is known as bleed-through and is described as the detection of one fluorophore in another fluorophore’s filter set. Bleed-through makes it difficult to observe distinct fluorescence signals and tangles the evaluation of co-localization experiments.
Please note: While selecting fluorophores, check the emission and excitation spectra for spectral overlap with the help of a spectrum viewer.
Select the best fluorophore to be detectable by separate channels based on the target protein expression.
- Based on the expression level/pattern of the protein of interest, decide what antigen to detect with which fluorophore in multi-color experiments. The brightest fluorophore should be reserved for the detection of the antigen with the least abundant expression level. The dimmest fluorophore should be used for detecting the most abundant antigen.
Tip 3: Choose the best multi-color staining
Option 1: Unlabeled antibodies and sequential incubations
This option is useful when the primary antibodies are from different hosts (e.g., a mouse monoclonal against antigen A, rabbit polyclonal against antigen B, and a goat polyclonal against antigen C) and the antibodies display aggregates formation in the simultaneous incubation method.
Option 2: Unlabeled primary antibodies and simultaneous incubations
This option is useful when the primary antibodies are from different hosts (e.g., a mouse monoclonal antibody against antigen A and a rabbit polyclonal antibody against antigen B).
Please note: The blocking buffer can be prepared by mixing the serum from each host of the secondary antibodies.
Option 3: Directly labeled primary antibodies and simultaneous incubations
This option is useful when the primary antibodies are from the same host (e.g., a mouse monoclonal against antigen A and a mouse monoclonal against antigen B).
Employ counterstains to help identify cellular landmarks
Counterstains are used for two different purposes:
- To reduce background fluorescence
- To identify cellular organelles and provide information regarding signal localization.
Recommended incubation for nuclear counterstains: RT 5 min incubation with 0.1–1 μg/mL nuclear stain dye and further extensive PBS washing (Figure 3).
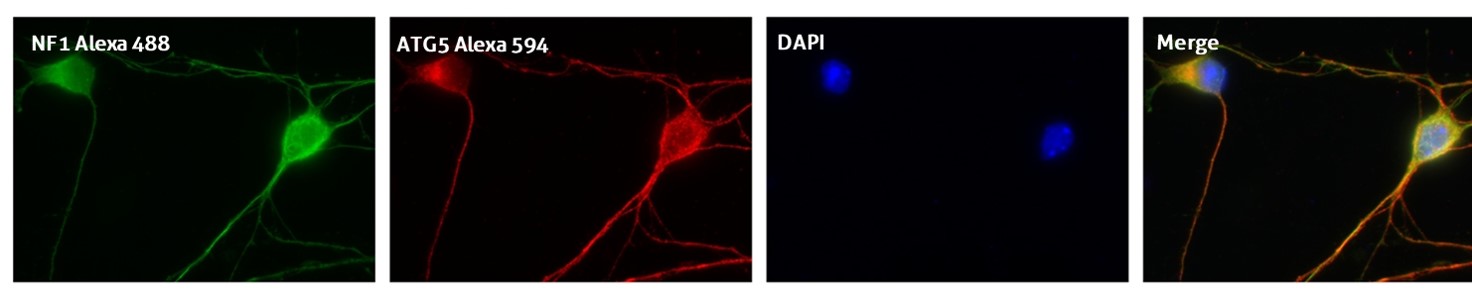
Figure 3. IF result of anti-ATG5 antibody (10181-2-AP; 1:50) with E15 mouse cortical neurons. The cells were co-stained with the NF1 antibody (green), under 40 x. Cells were fixed with 4% PFA and permeabilized with 0.2% Triton X-100.
Some mounting media solutions have DAPI already added and will harden after exposure to air, eliminating the need to seal the edges of the coverslip.
Please note: If a coverslip with cells is accidentally dropped and your sample side up and orientation is lost, you can still continue the experiment by carefully picking up the coverslip with tweezers: gently scrape one surface of the coverslip with a pipette tip to see if any cells are visibly removed to define coverslip orientation before mounting your sample.
Tip 4: What to consider before choosing the antibody/antibody pair
A polyclonal antibody contains a mixture of several isotypes of immunoglobulin G (e.g., IgG1, IgG2a). Therefore, to maximize detection of the target, it is best to use a secondary antibody that recognizes all isotypes. These are any secondary antibodies that are labeled “IgG H+L” (H and L represent heavy and light chains of IgG, respectively). This designation means that the secondary host species was immunized with a pool of IgGs from another species, allowing the purified secondary antibody to recognize all forms.
A monoclonal antibody contains a single isotype of immunoglobulin. Therefore, it is critical to use a secondary antibody that specifically recognizes that isotype. The isotype of the primary antibody should be indicated on the product’s datasheet.
The best way is to ensure that each of the primary antibodies is generated from a different species, in order that the fluorescent-labeled secondary antibodies used will then be detected through separate channels.
Tip 5: Include appropriate controls
In order to verify that the observed fluorescence is a result of staining rather than an unspecific artifact, include a minimum of four controls:
1. The unstained sample (to determine the autofluorescence background signal).
2. Slides stained only with the secondary antibody (to determine the threshold of background signal).
3. Tissue / cell type control. Slides with tissue/cells are known to express (or not express) the epitope of interest.
4. Perform each staining separately (to ensure no cross-reactions and appropriate labeling).
Please note: Make sure the picture truly represents the more common, representative pattern observed along the whole sample.