7 Tech Tips For Successful ChIP Experiments
New to ChIP or just want to improve? Our tech tips will help you achieve successful ChIP experiments
Chromatin Immunoprecipitation (ChIP) overview
|
In view of the increasing evidence that chromatin structure plays a decisive role in regulating gene expression. ChIP allows for simultaneous study of both structural and functional aspects of gene regulation. Below is a summary of the most relevant tips to help you optimize your ChIP experiment.
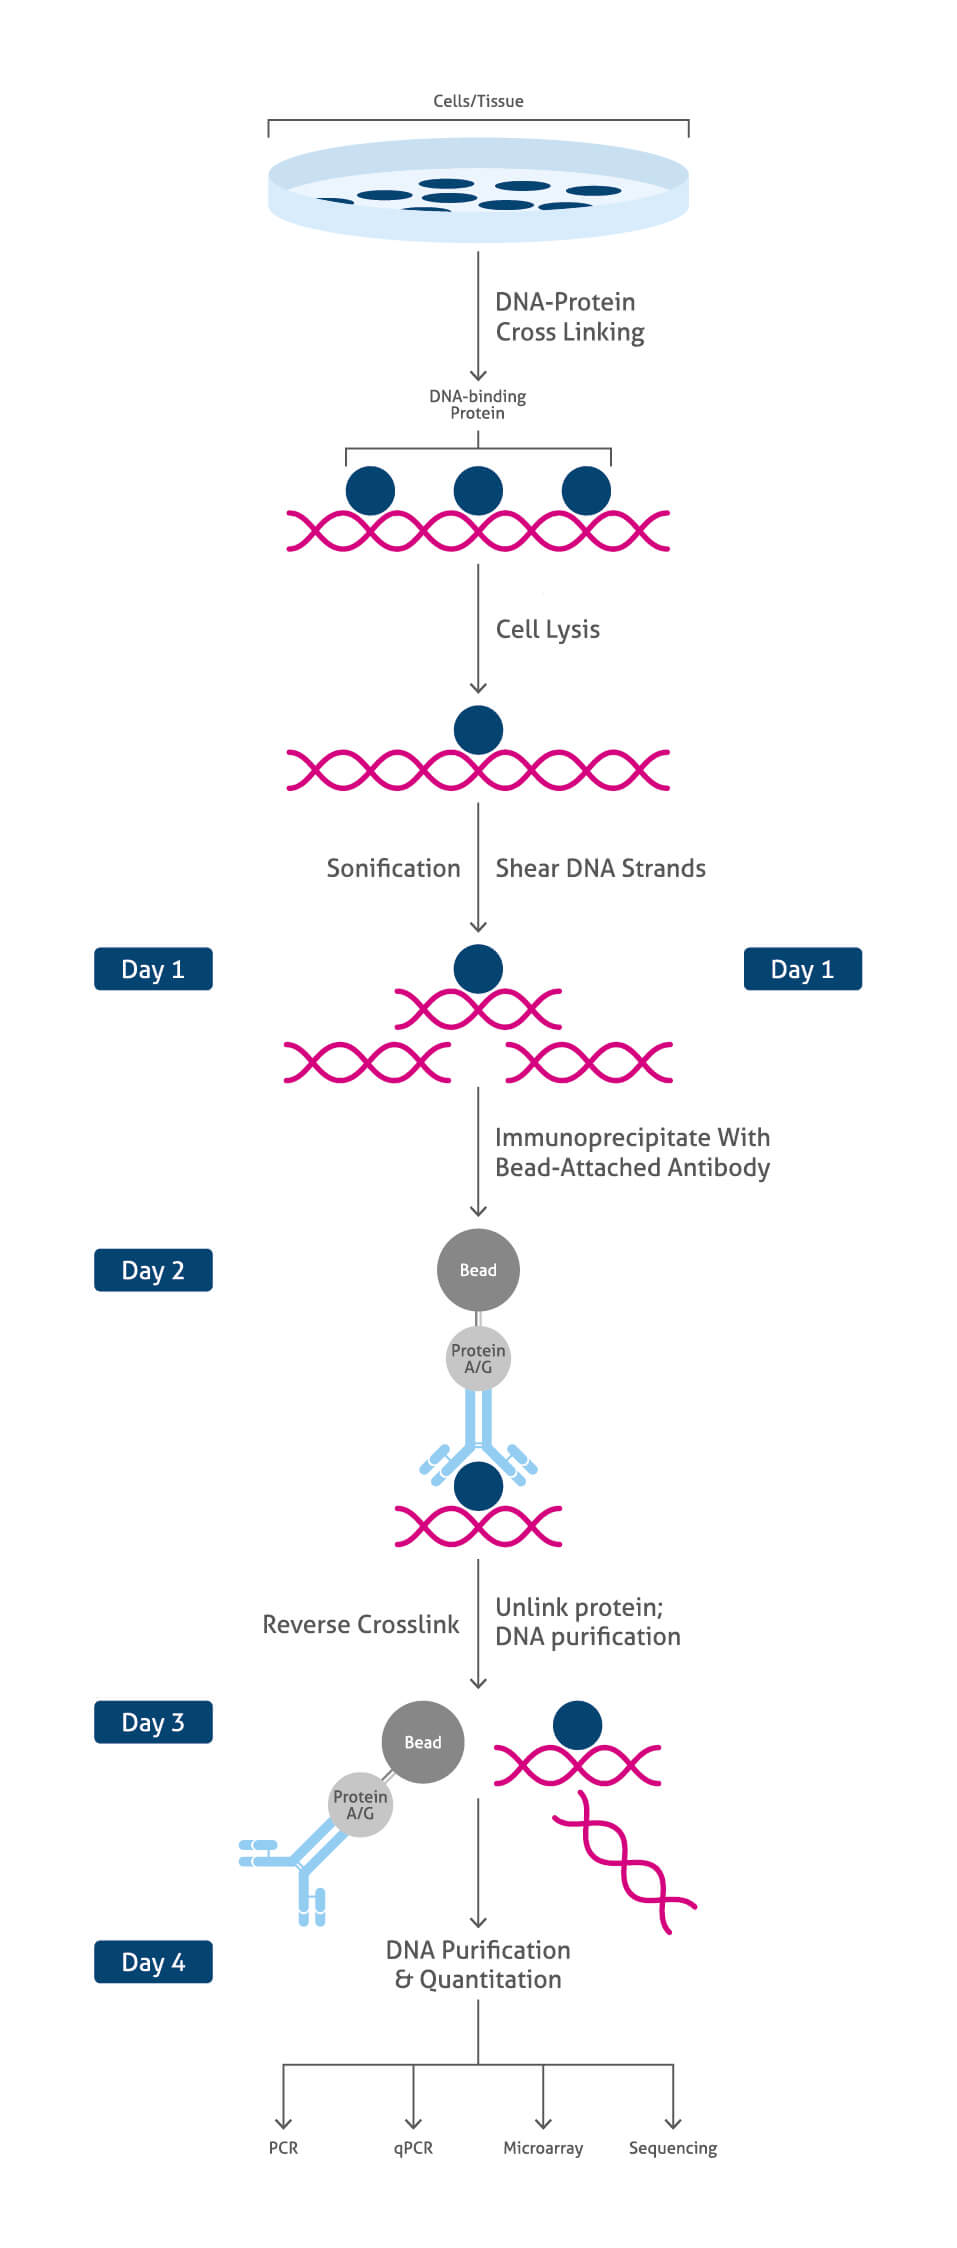
ChIP workflow summary:
- cell/ tissue isolation
- DNA-protein cross-linking stabilizing target protein at its chromatin binding site
At this point the ChIP protocol can be stopped and stored at -80°C
- cell lysis providing access to chromatin
- chromatin fragmentation (sonication)
At this point the ChIP protocol can be stopped and stored at -80°C
- immunoprecipitation (IP)/ pull-down of chromatin fragments using specific antibodies
- reverse crosslink to pull apart antibody targeted proteins from DNA fragments
- purification and clean-up of DNA fragments
- DNA analysis: PCR, qPCR, microarray, sequencing
View full ChIP protocol here
Tips for successful ChIP experiment
1: Always keep cells/tissue on ice
- Temperature is critical. Perform cell lysis at 4 °C.
- Keep the samples ice-cold and use ice-cold buffers.
2: Under/over cross-linking
- Both cross-linking time and formaldehyde concentration are important.
- Please note: When using paraformaldehyde, ensure that it is freshly prepared (final concentration of 1%–1.5%).
- The duration of cross-linking is key and can result in under or over cross-linking
| Under cross-linking | Over cross-linking |
|
can result in inefficient cross-linking and prevent the disassociation of protein–DNA complexes and result in poor yield |
can mask epitope sites crucial for antibody binding, cause difficulty in lysing, prevent chromatin shearing, and inhibit reverse cross-linking of the protein–DNA complex |
3: Chromatin shearing and sonication
- Avoid large fragments in the tissue suspension.
- Ensure tissue’s fine homogenization with cut pipette tip.
- Ensure the sonicator probe is not in contact with the tube wall.
- Increase the number of sonication steps for better chromatin shearing; however, avoid increasing the time (or the power) of each step as this may overheat the sample and lead to loss of antigenicity.
- Add ice to the sonicator to avoid the sample overheating.
- Preferably do not sonicate chromatin to a fragment size of less than 500 bp (perform agarose gel electrophoresis to determine chromatin sizes).
- Please note: Different cell types may have different optimal DNA fragmentation. Optimize sonication time and amplitude to obtain optimal DNA fragmentation.
- Prepare input sample for quantitative analysis of chromatin in ChIP
4: Immunoprecipitation (IP)
- IP fraction represents the fraction of diluted and pre-cleared ChIP. It is used for the immunoprecipitation step involving the antibody of interest or control antibody.
- Use around 25ug of DNA per IP reaction
- Use between 1-10ug of antibody per 25ug of DNA
- Some antibodies may allow short room temperature incubations with lysate; however, in general, an overnight incubation at 4°C will increase signal and specificity.
| Antibody choice | |
| Antibody selection | Antibodies that work for IHC, WB and IF might not work for ChIP. Antibody needs to recognise epitope exposed on protein-DNA complex. |
| Antibody specificity |
Whether the antibody worked for ChIP can be verified by WB and or ELISA after IP reaction. |
| Antibody concentration |
Too much antibody can increase PCR background To little can lack material for PCR analysis |
- Prepare beads; if Protein A and Protein G beads used, mix equal volumes
- Wash bead mixture multiple times in RIPA buffer
- Block beads to prevent non-specific binding
- Add beads to samples for IP reaction and incubate overnight at 4°C
| Bead choice | |
| Magnetic | Easy separation of magnetic beads using magnet; good beads visibility in the tube; lower material loss |
| Agarose | High binding capacity due to porous nature and high surface area |
| Protein A | Highest affinity for rabbit polyclonal antibodies |
| Protein G | Highest affinity for a range of antibodies |
| Protein A/G | The highest affinity combining Protein A and G affinity for antibodies |
- Prepare positive and negative controls for every ChIP experiment
- Use reactions for known (positive) and unknown (negative) genomic regions as experimental controls
| ChIP controls | |
| Antibody controls | Histone H3 is commonly used as positive antibody control, while negative antibody control is used to recognise non-chromatin epitope e.g. GFP antibody |
| Negative controls | Use of beads only or beads with control immunoglobulin (Ig), providing background for the assay |
| Loci controls | Use of primers where protein modification is present (positive control) and absent (negative control), should be tested in RT-PCR |
| Non-template controls | Non-template control should be used in PCR to spot potential contamination |
5: Reverse cross-linking
- Usually, a 15-minute incubation at 95 °C is sufficient to induce reverse cross-linking (break protein-DNA complexes).
- Some samples require Proteinase K treatment for up to 16 hours at 65 °C, which facilitates peptide cleavage.
6: DNA elution and purification
- Use different washing buffers (low & high salt, LiCl and TE buffers).
- While using a commercial purification column, check the column is completely dry after the wash step as any leftover moisture will inhibit elution.
- Make sure the elution buffer is placed directly onto the silica membrane and allowed to adsorb for at least one minute.
- Prepare new solutions from stocks to avoid contamination.
- A weak PCR signal or no DNA amplification shown in the samples may be due to an inadequate primer result in the PCR amplified region spanning the nucleosome-free region.
- Please note: Test primer pairs for genomic DNA using different primer conditions and dilutions. The use of standard/input DNA will determine the efficacy of the primers.
- Ensure there is enough DNA in the PCR reaction, and your PCR conditions are optimal. Add more DNA to the PCR reaction or increase the number of amplification cycles if needed.
- To avoid variations between replicates, add the same amount of protein G/A-agarose or magnetic beads for all samples. Ensure beads are well suspended while pipetting.
- While there is no product in the positive control ensure there is enough chromatin or antibody within the IP reaction.
- Ensure the IP incubation time is optimized.
- Complete the elution of chromatin from protein G/A beads. Elution is optimal at 65 °C with frequent mixing to keep beads suspended in solution (~10 minutes).
Key ‘take home’ messages:
- Work on ice and maintain cold temperature of reagents throughout
- Optimise chromatin shearing conditions for your sample
- Verify and know your antibodies, they don’t always have to be ChIP validated
- Use positive and negative controls to prove that your results are trustworthy
- Optimise reverse cross-linking conditions
- Purify and quantify your DNA before further analysis